
This post documents how I wrote and compiled a minimal init program in C, built a simple initramfs, and successfully booted it using a custom Linux kernel v6.12 on Ubuntu 24.04 via QEMU. Before you begin, make sure you’ve already built your own Linux kernel as shown in this post.
Create a Minimal C Project
1
2
3
mkdir -p my-init/bin
cd my-init
touch init.c
Edit init.c:
1
2
3
4
5
6
7
8
9
10
11
12
13
14
15
16
// init.c
#include <stdio.h>
#include <unistd.h>

int main() {
    while (1) {
        printf("$ ");
        fflush(stdout);

        char input[256];
        if (fgets(input, sizeof(input), stdin) == NULL) break;

        printf("Sorry, I don't know how to do that.\n");
    }
    return 0;
}
Now compile this as a statically linked binary. This ensures the kernel doesn’t rely on any external shared libraries or runtime:
1
gcc init.c -static -o bin/init
Build an initramfs Image
Before the kernel can execute the init program, we must place it inside an initial RAM-based file system (initramfs). The kernel will extract this archive into memory at boot and use it as the root filesystem.
1
2
3
4
cd bin
chmod +x init
cd ..
find . -print0 | cpio --null --create --verbose --format=newc | gzip -9 > ../initrd
This generates an initrd file — a gzipped cpio archive — which contains your custom init binary.
Enable Kernel Features
Make sure your kernel supports initramfs, ELF binaries, and 64-bit execution. Run:
1
make menuconfig
Then enable these options:
- General setup —> Initial RAM filesystem and RAM disk (initramfs/initrd) support
- Executable file formats —> Kernel support for ELF binaries
- Processor type and features —> 64-bit kernel
Recompile the kernel afterward if needed.
Boot with QEMU
Now boot your kernel and initramfs using QEMU:
1
qemu-system-x86_64 -kernel arch/x86/boot/bzImage -initrd initrd -nographic -append "console=ttyS0"
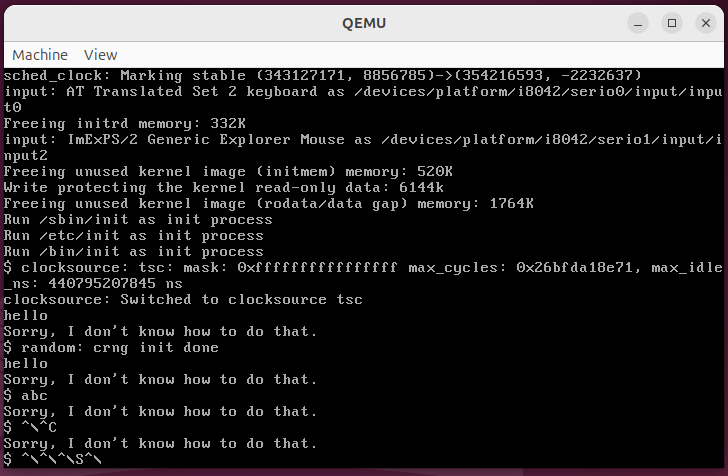
Expected output:
1
2
3
$ Sorry, I don't know how to do that.
$ Sorry, I don't know how to do that.
...
Each time you type a line and press Enter, it responds with a fixed message — just like the minimal shell we designed!
Comments powered by Disqus.