Install opencv-python.
1
$ pip install opencv-python
OpenCV Read File
Name a image as image.jpg and place it in the same directory as the python script below.
1
2
3
4
5
# showimg.py
import cv2
img = cv2.imread("image.jpg")
cv2.imshow("Image", img)
cv2.waitKey(0)
Execute:
1
$ python showimg.py
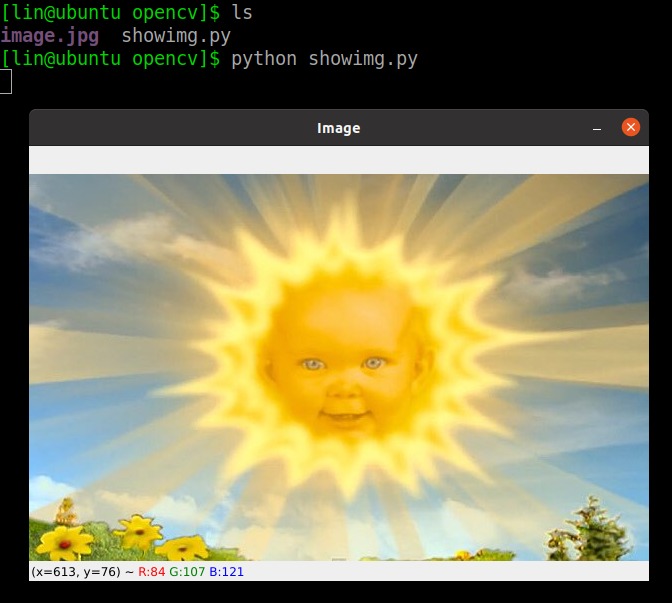
You can close the window by pressing any key on the keyboard; please avoid using the mouse to click on the red ‘X’ in the upper right corner of the window, as it may cause the program to enter an infinite loop. To prevent accidental actions, you can use the following script instead.
1
2
3
4
5
6
7
8
9
# showing.py
import cv2
img = cv2.imread("image.jpg")
while True:
    cv2.imshow("Image",img)
    # 27 is keycode of ESC
    if cv2.waitKey(100) == 27:
        cv2.destroyWindow("Image")
        break
In this way, you need to press the ESC key to close the window, ensuring there won’t be an infinite loop.
To read an image in grayscale format, simply pass cv2.IMREAD_GRAYSCALE as the second argument to imread.
1
img = cv2.imread("image.jpg", cv2.IMREAD_GRAYSCALE)
Additionally, you can also use cv2.cvtColor to convert a color image into grayscale.
1
2
img = cv2.imread("image.jpg")
gray_img = cv2.cvtColor(img, cv2.COLOR_BGR2GRAY)
The grayscale image is as follows:

Writing Files with OpenCV
You can use imwrite to save an image in the corresponding format based on the file extension.
1
2
3
4
5
# showimg.py
import cv2
img = cv2.imread("image.jpg")
cv2.imwrite('save.jpg', img)
cv2.imwrite('save.png', img)
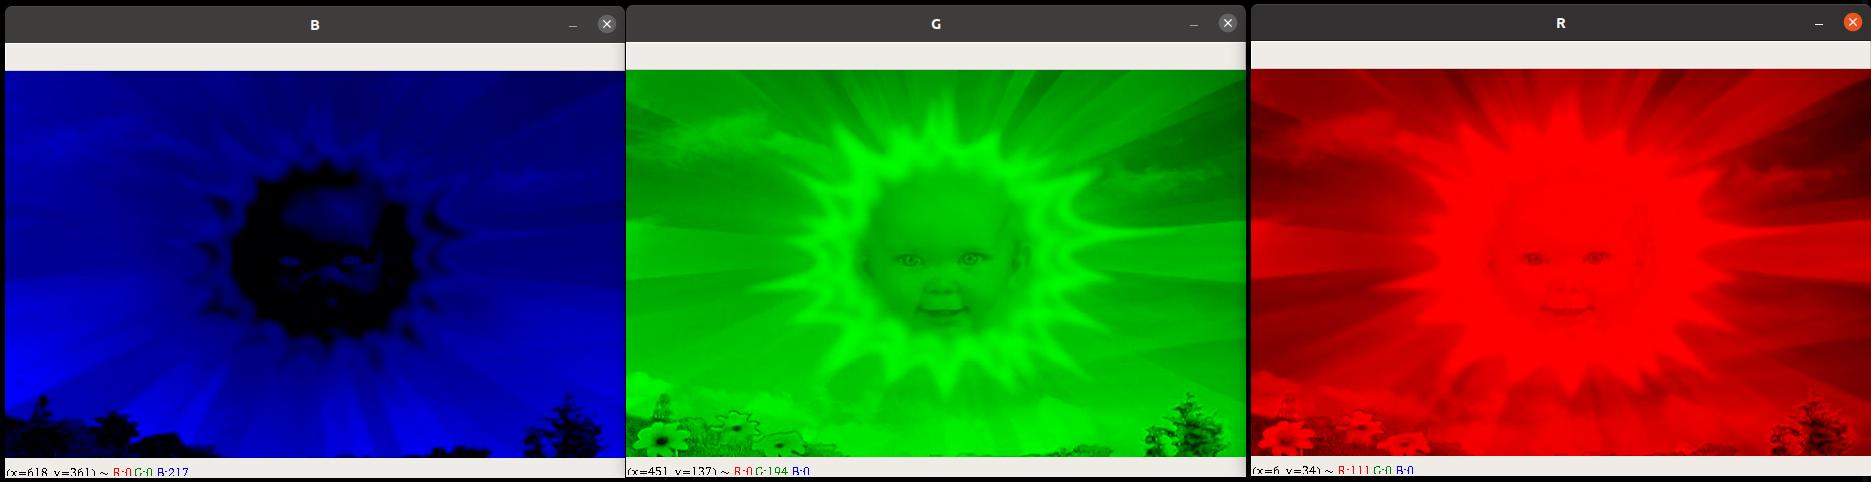
RGB Channels
Images loaded by OpenCV are represented as multi-dimensional numpy arrays. For color images, each pixel in the image is arranged from left to right in the order of blue, green, and red values (BGR channel).

Printing the dimensions of a numpy array in the terminal would look like this:
1
2
img = cv2.imread("image.jpg")
print(img.shape)
1
(387, 620, 3)
The 3 represents the three BGR channels, 620 denotes the width of the image, and 387 represents the height of the image. Therefore, this is a 620x387 BGR color image. Let’s proceed to print this image.
1
print(img)
1
2
3
4
5
6
7
8
9
10
11
12
13
14
15
16
17
[[[169 159 142]
  [169 159 142]
  [169 159 142]
  ...
  [ 95 114 122]
  [ 98 114 121]
  [ 98 114 121]]

 ...

 [[ 20 130 102]
  [ 29 139 111]
  [ 28 135 108]
  ...
  [230 195 131]
  [231 195 131]
  [232 196 132]]]
It can be observed that three values grouped together represent one pixel, forming a two-dimensional array with pixels as elements. Each BGR value ranges from 0 to 255. In the case of grayscale images, there is no grouping of BGR values; instead, each pixel’s grayscale level is directly represented by a single value ranging from 0 to 255.
Next, we can use the split function to separate the BGR image into three individual two-dimensional arrays, one for each channel. Then, by using the merge function, we can fill the other unwanted channels with 0 to isolate the three independent BGR channels.
1
2
3
4
5
6
7
8
9
10
11
12
13
14
import cv2
import numpy as np
img = cv2.imread("image.jpg")
zero_channel = np.zeros(img.shape[0:2], dtype = "uint8")

B, G, R = cv2.split(img)
imgB = cv2.merge([B, zero_channel, zero_channel])
imgG = cv2.merge([zero_channel, G, zero_channel])
imgR = cv2.merge([zero_channel, zero_channel, R])

cv2.imshow("B", imgB)
cv2.imshow("G", imgG)
cv2.imshow("R", imgR)
cv2.waitKey(0)
If you want to combine the original image using the BGR three channels, you can use the following code:
1
imgBGR = cv2.merge([B, G, R])
Comments powered by Disqus.